1. 자동 의존성 주입
– 자동 컨테이너 등록
앞의 예제에서는 Spring Bean을 등록할 때 구성 정보에 직접 등록해야 하는 Spring Bean을 Java 코드 또는 XML에서 @Bean을 통해 수동으로 등록했지만 Spring에서는 Spring Bean을 자동으로 등록하는 @ComponentScan이라는 기능을 제공합니다.
새로운 자동 구성을 수행하는 스케줄러
package hello.core;
import org.springframework.context.annotation.ComponentScan;
import org.springframework.context.annotation.Configuration;
import org.springframework.context.annotation.FilterType;
import static org.springframework.context.annotation.ComponentScan.*;

@Configuration
@ComponentScan
public class AutoAppConfig {

}
@ComponentScan 주석을 첨부하면 @Bean 주석 및 내용이 없습니다.
빈으로 등록할 클래스에 @Component 어노테이션을 직접 붙이면 자동으로 빈으로 등록된다.
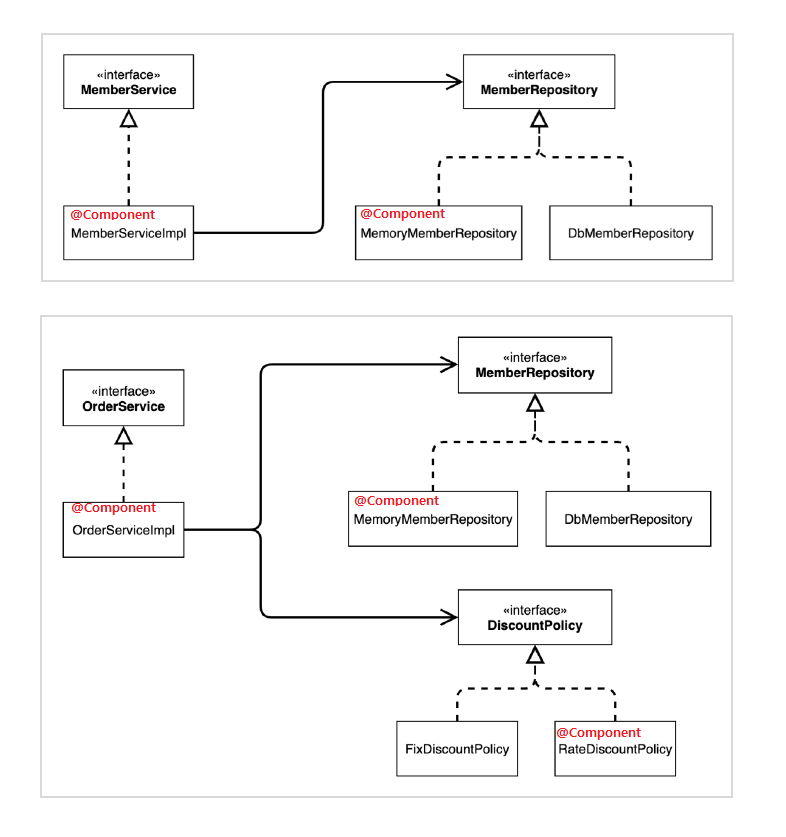
@Component 어노테이션을 추가하여 Bean이 MemberRepository에 대한 종속성을 주입하도록 MemoryMemberRepository만 등록하십시오.
마찬가지로 DiscountPolicy를 사용하면 RateDiscountPolicy에만 @Component 주석이 추가됩니다.
예)
@Component
public class MemoryMemberRepository implements MemberRepository {
	...
}
@Component
public class RateDiscountPolicy implements DiscountPolicy {
...
}
기본 구성 요소 스캔 대상
– @Component : 컴포넌트 스캔 시 사용
– @Controller : Spring MVC 컨트롤러에서 사용
– @Service: Spring 비즈니스 로직에서 사용
– @Repository : Spring 데이터 접근 계층에서 사용
– @Configuration: 스프링 설정 정보에 사용
Spring 컨테이너를 인스턴스화할 때 적절한 구성 파일을 인수로 전달합니다.
– 자동 의존성 주입 등록
@Autowire 주석을 통한 자동 의존성 주입.
예)
@Component
public class MemberServiceImpl implements MemberService {
	private final MemberRepository memberRepository;

    @Autowired
	public MemberServiceImpl(MemberRepository memberRepository) {
		this.memberRepository = memberRepository;
	}
}
@Component
public class OrderServiceImpl implements OrderService {
private final MemberRepository memberRepository;
private final DiscountPolicy discountPolicy;
// 여러 의존관계 한번에 주입 가능
@Autowired
public OrderServiceImpl(MemberRepository memberRepository, DiscountPolicy discountPolicy) {
this.memberRepository = memberRepository;
this.discountPolicy = discountPolicy;
}
}@Autowire의 기본 검색 전략은 같은 유형이 비어 있음찾기 및 삽입 getBean(MemberRepository.class) 및 getBean(DiscountPolicy.class)과 동일합니다.
2. Bean 검색 위치 및 기본 검사 대상
모든 Java 클래스의 구성 요소를 검색하는 데 시간이 오래 걸립니다. 따라서 가장 필요한 위치부터 검색 시작 위치를 지정할 수 있습니다.
@ComponentScan( basePackages = "hello.core" )
basePackages : 검색할 패키지의 시작 위치를 지정합니다. 이 패키지를 포함하는 모든 하위 패키지를 검색합니다. basePackages = {“hello.core”, “hello.service”} 와 같은 여러 시작 위치를 지정할 수도 있습니다.
basePackageClasses : 지정된 클래스의 패키지를 검색 시작 위치로 설정합니다.
지정하지 않으면 @ComponentScan이 첨부된 구성 정보 클래스 패키지가 시작 위치가 됩니다.
※ 추천방법
구성 정보 클래스의 위치는 패키지 위치를 지정하지 않고 프로젝트의 맨 위에 배치됩니다. 최신 Spring Boot도 기본적으로 이 방법을 제공합니다.
3. 컴포넌트 스캔 대상 필터
includeFilters: 구성 요소에 대한 추가 검사 대상을 식별합니다.
ExcludeFilters: 구성 요소 검사에서 제외할 개체를 지정합니다.
– 주석 생성
구성 요소 검사 대상에 추가할 주석
package hello.core.scan.filter;
import java.lang.annotation.*;

@Target(ElementType.TYPE)
@Retention(RetentionPolicy.RUNTIME)
@Documented
public @interface MyIncludeComponent { }
구성 요소 검사에서 제외할 주석
package hello.core.scan.filter;
import java.lang.annotation.*;

@Target(ElementType.TYPE)
@Retention(RetentionPolicy.RUNTIME)
@Documented
public @interface MyExcludeComponent { }
– 주석 적용
구성 요소 검사 대상에 추가할 클래스
package hello.core.scan.filter;

@MyIncludeComponent
public class BeanA { }
구성 요소 검사에서 제외할 클래스
package hello.core.scan.filter;
@MyExcludeComponent
public class BeanB { }
– 시험
package hello.core.scan.filter;

import org.junit.jupiter.api.Assertions;
import org.junit.jupiter.api.Test;
import org.springframework.beans.factory.NoSuchBeanDefinitionException;
import org.springframework.context.ApplicationContext;
import org.springframework.context.annotation.AnnotationConfigApplicationContext;
import org.springframework.context.annotation.ComponentScan;
import org.springframework.context.annotation.Configuration;
import org.springframework.context.annotation.FilterType;
import static org.assertj.core.api.Assertions.assertThat;
import static org.springframework.context.annotation.ComponentScan.Filter;

public class ComponentFilterAppConfigTest {
	@Test
	void filterScan() {
		ApplicationContext ac = new AnnotationConfigApplicationContext(ComponentFilterAppConfig.class);
		BeanA beanA = ac.getBean("beanA", BeanA.class);
		assertThat(beanA).isNotNull();
		Assertions.assertThrows(
			NoSuchBeanDefinitionException.class,
			() -> ac.getBean("beanB", BeanB.class));
	}

	@Configuration
	@ComponentScan(
		includeFilters = @Filter(type = FilterType.ANNOTATION, classes = MyIncludeComponent.class),
		excludeFilters = @Filter(type = FilterType.ANNOTATION, classes = MyExcludeComponent.class)
	)
	static class ComponentFilterAppConfig { }
}
FilterType에 대한 5가지 옵션
주석: 주석의 기본값, 감지 및 작동.
ASSIGNABLE_TYPE: 주어진 클래스의 유형과 하위 클래스의 유형을 인식하여 작동합니다.
ASPECTJ: AspectJ 패턴 사용
REGEX: 정규 표현식
CUSTOM: TypeFilter라는 인터페이스를 구현하여 처리
4. 중복 등록 및 충돌
– 자동 빈 등록 vs. 자동 콩 등록
컴포넌트 스캔을 통한 자동 스프링 콩이름이 등록시 동일하면 Spring은 ConflictingBeanDefinitionException 예외를 발생시킵니다.
– 수동 콩 등록 대 자동 콩 등록
수동 콩 레지스트리가 우선하며 덮어썼음을 나타내는 로그를 발행합니다.
빈 “XXXX”에 대한 빈 정의를 다른 정의로 덮어씁니다: 교체
가능하면 자동 Bean을 사용하는 것이 좋습니다.